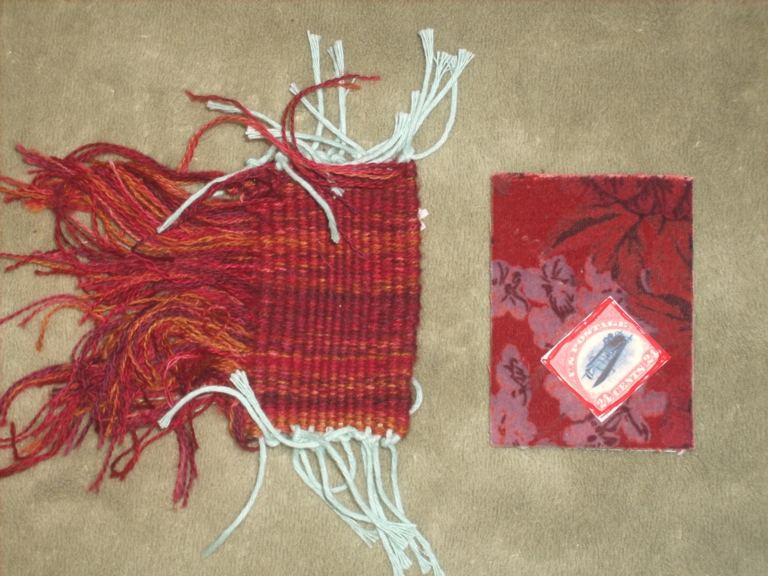
Well, actually I am going to be published. Last winter there was a call for submissions for a new Lark Book for the 500 series. It was 500 felt objects. I submitted 5 pieces along with over 1000 other pieces. The final decision was suppose to be made by December. I heard nothing and so though that I had not been selected. Good enough, I thought.
Last week one of my collegues asked me if I had heard anything from the selection committee to which I could reply "no". She then told me that they selection committee has to take until February to decide and that letters were in the mail for those that had been selected. "Second chance!", I thought, but still didn't expect much. And Wednesday when I arrived home, there was a letter stating that I had had not one but TWO pieces selected to be in the book! There is no money involved but I do get a free book and I do get to say that I have been published!
The second image will have to wait. There seems to be some issue with blogger not wanting to upload it. Oh well. Maybe I'll make you wait until September!
(With apologies to Dr. Seuss) One thread Two thread, Red thread Blue thread. Black thread Blue thread, Old thread New thread. Look! I knit a little star! I can crochet in the car! Oh what a lot of threads there are!
Showing posts with label art stuff. Show all posts
Sunday, March 06, 2011
Tuesday, February 01, 2011
ATC
That would be Artist Trading Cards for the uninitiated. I was one of your number until I got an invitation to participate.
Artist trading cards are like hockey cards, or Pokemon cards. Apparently. The idea is to get a bunch of artist types together, everyone makes as many cards as there are supposed to be people, and have an evening of fun. The cards are suppose to be around 2.5 x 3.5 inches. And that is it! Any medium is acceptable.
In our group there were 58 people who registered to participate but there were a few no shows. We had to postpone the event a week because we had a bad storm and some people had other commitments but sent their cards. Which meant that there were a few cards left over. We were invited to trade our extra cards if we wanted to but some people abandoned theirs and so I picked up a few extras of my favorites.
We all were assigned numbers and laid out our cards at our assigned station. We then had about an hour to mingle and look at the other cards that people had made. Then we were told to go back to our cards and pick one then we would all move one station to the right. We then had 45 seconds to chose our card from that persons cards before moving on to the next station. Sometimes 45 seconds was not enough time and sometimes I was able to quickly grab one and then peek over Celine's shoulder (she was in front of me) to see which one I might like.
Some of the cards were beautiful. You could really tell the thought, attention, and time that went into them. Some were nice but not spectacular. And some were, in my mind, uninspiring. You will be able to tell the ones that I really liked because there is more than one.
A word here on the photographers. There were a few who printed one photograph. That was it. These were the easiest to chose from. There were a number of them who simply took a half a dozen pictures and printed multiple copies. Also easy. There were others who printed 58 different photos. Much more difficult and much more fun. One fellow printed a large format photo twice and chopped up one as his cards and used the other to lay it out on so that as people took their small piece, they could still see the "big picture".
Mine were silk fusion that I screen printed on, chopped up, sewed the edges, then did a photochemical transfer on the back. The theme of the evening for me was "gecko". I rate mine in the nice but not spectacular category. The ones that I felt were the most successful were the ones from which people had a hard time choosing. Having been there and having seen the possibilities, I have ideas for the future, should something like this ever cross my path again.
And people have been asking ....."OK, so now what will you do with them?" Some may get mounted and put on display, some may end up in my sketch book, and others will probably end up languishing in a drawer somewhere for an indeterminate amount of time before going gently to that great recycling bin in the sky.
Artist trading cards are like hockey cards, or Pokemon cards. Apparently. The idea is to get a bunch of artist types together, everyone makes as many cards as there are supposed to be people, and have an evening of fun. The cards are suppose to be around 2.5 x 3.5 inches. And that is it! Any medium is acceptable.
In our group there were 58 people who registered to participate but there were a few no shows. We had to postpone the event a week because we had a bad storm and some people had other commitments but sent their cards. Which meant that there were a few cards left over. We were invited to trade our extra cards if we wanted to but some people abandoned theirs and so I picked up a few extras of my favorites.
We all were assigned numbers and laid out our cards at our assigned station. We then had about an hour to mingle and look at the other cards that people had made. Then we were told to go back to our cards and pick one then we would all move one station to the right. We then had 45 seconds to chose our card from that persons cards before moving on to the next station. Sometimes 45 seconds was not enough time and sometimes I was able to quickly grab one and then peek over Celine's shoulder (she was in front of me) to see which one I might like.
Some of the cards were beautiful. You could really tell the thought, attention, and time that went into them. Some were nice but not spectacular. And some were, in my mind, uninspiring. You will be able to tell the ones that I really liked because there is more than one.
![]() | |||||||
| Celine's teeth |
![]() |
| this person did 58 collages on a watercolour |
![]() |
| a local print maker David |
![]() | |
| a variety of photographs |
A word here on the photographers. There were a few who printed one photograph. That was it. These were the easiest to chose from. There were a number of them who simply took a half a dozen pictures and printed multiple copies. Also easy. There were others who printed 58 different photos. Much more difficult and much more fun. One fellow printed a large format photo twice and chopped up one as his cards and used the other to lay it out on so that as people took their small piece, they could still see the "big picture".
![]() |
| and a few more |
![]() |
| Harriet who love butterflies |
![]() |
| some prints, some paintings, some drawings. |
![]() |
| a found photo and ten very dirty little secrets that I probably never would have revealed if they were mine. |
![]() |
| clay |
![]() |
| One of my favorites |
![]() |
| Sarah, in her insanity, WOVE all of hers. 58 remember! |
![]() |
| lovely delicate drawings |
![]() |
| Sue's made from old newspaper layout tape. I have some of this stuff and I love using it. |
![]() |
| mine |
And people have been asking ....."OK, so now what will you do with them?" Some may get mounted and put on display, some may end up in my sketch book, and others will probably end up languishing in a drawer somewhere for an indeterminate amount of time before going gently to that great recycling bin in the sky.
Thursday, July 29, 2010
Cocoons
For those of you who don't like talk of mayhem concerning bugs....look away. Nothing for you here folks. Move along.
For the rest of you, I purchased some silk cocoons a couple of months ago. I got a kilogram. I know it would be a lot, but I didn't realise that it would be about two grocery bags full! I now have a lot of cocoons to experiment with! I gave a few away to one of the graduating students that expressed an interest in them but still have plenty left.
Last month I led a silk scarf dyeing workshop for which I mixed the dyes ahead of time. I wasn't sure which colours people would like, and I knew that I had at least 9 people and I wanted to make sure that no one ran out. I mixed way too much dye. There was a lot left over.
So dyed some warps and wefts. Enough for 16 scarves. And still there was dye left over!
I dyed some soy silk and still there was dye left over!
So I searched around for something else to dye and found my cocoons! I dumped them straight in the bottles of dyes and added some of the dye fixative and shook. No pictures of this because my gloves were covered in dye by this time. The silk scarves need to sit for 5 days. I let my cocoons sit for 2 before realizing that they looked really dark. It was hard to distinguish the black from the green from the purple. The red was easy too pick out. I dried them out and they sat.
Then I did my residency in the very humid museum where I had my cocoons on display. Then I packed them up is a Ziploc bag and came home.
Bad idea as it turned out.
About a week later I was digging through my stuff and found my bag of cocoons. And they were MOLDY! ARRRRRGGGGHHHHHH! I brought them out side, washed them in the bag with the hose several times and decided that they must be dealt with right away. Grrrrrr.
Into the dye pot they went with some sythropol and baking soda. And they simmered for a while. And it smelled kind of gross.
But the good news was that all that boiling pulled a little of the dye out and I was able to distinguish the colours. Sort of.
I guess that boiling them for a while wasn't quite long enough because I didn't managed to boil all of the sericin out of them. As a result, Mira, who helped with the stretching, and I managed to pull them into some pretty interesting shapes with interesting little lumps and bumps in them. I was amazed at how firm they still were and how had you had to pull them in order to stretch them out.
We pulled about 5 or 6 trays worth. She has already used some of hers in a small felt dress for a felted alien that she is making. Mine are still languishing waiting for me to put on my felting cap again. I am busy weaving and trying to breath in all this heat and humidity.
For the rest of you, I purchased some silk cocoons a couple of months ago. I got a kilogram. I know it would be a lot, but I didn't realise that it would be about two grocery bags full! I now have a lot of cocoons to experiment with! I gave a few away to one of the graduating students that expressed an interest in them but still have plenty left.
Last month I led a silk scarf dyeing workshop for which I mixed the dyes ahead of time. I wasn't sure which colours people would like, and I knew that I had at least 9 people and I wanted to make sure that no one ran out. I mixed way too much dye. There was a lot left over.
So dyed some warps and wefts. Enough for 16 scarves. And still there was dye left over!
I dyed some soy silk and still there was dye left over!
So I searched around for something else to dye and found my cocoons! I dumped them straight in the bottles of dyes and added some of the dye fixative and shook. No pictures of this because my gloves were covered in dye by this time. The silk scarves need to sit for 5 days. I let my cocoons sit for 2 before realizing that they looked really dark. It was hard to distinguish the black from the green from the purple. The red was easy too pick out. I dried them out and they sat.
Then I did my residency in the very humid museum where I had my cocoons on display. Then I packed them up is a Ziploc bag and came home.
Bad idea as it turned out.
About a week later I was digging through my stuff and found my bag of cocoons. And they were MOLDY! ARRRRRGGGGHHHHHH! I brought them out side, washed them in the bag with the hose several times and decided that they must be dealt with right away. Grrrrrr.
Into the dye pot they went with some sythropol and baking soda. And they simmered for a while. And it smelled kind of gross.
![]() |
| Cocoons being rinse. they smell much better now. |
![]() |
| They little pupa that did all the work. In the you tube videos I watched, the people giving the tours said that you could eat these guys. they were good and full of protein. I think I'll pass. |
We pulled about 5 or 6 trays worth. She has already used some of hers in a small felt dress for a felted alien that she is making. Mine are still languishing waiting for me to put on my felting cap again. I am busy weaving and trying to breath in all this heat and humidity.
Saturday, January 02, 2010
matching colours
Sarah helped me with the Christmas Choice Craft Sale because my co-organizer was home with a preemie baby and was not available. However, I am very glad to report that Connor is doing fine these days.
When I found out that my co-organizer (coincidentally also named Sarah) would not be able to be there, I called in.....my other friend Sarah. Why do I feel like I'm in the remake of the Bob Newhart show?
In any case, Sarah was more than happy to keep me company, and refill the cookies and keep an eye on the mulled cider and do a thousand other things that needed doing while I was in at the sale and trying to flog my wares.
As payment I offered Sarah anything she wanted, such was my gratitude. Money, fast cars, drugs (well. Maybe Tylenol and Sucrets would be as far as that offer would go)
In any case, she just asked that I dye a skein of yarn to match a skein of silk that she bought off of me last year. No worries! I said....until I realized that the skein that I had dyed before was silk and was dyed with acid dyes and the skein that she wanted dyed to match was a silk bamboo blend and needed to be dyed with fibre reactive dyes because acid dyes will not dye bamboo.
Lesson time.... in my world, there are two basic types of dye. Acid dyes dye protein fiber, which is basically anything that comes off of an animal. Or out of in the case of silk.
Fiber reactive dyes are dyes that will work on cellulose fibers or anything that is plant based. Or, again, silk.
SO my task was to match a colour created with acid dyes with fiber reactive dyes. This is like comparing apples to oranges. There are two different types of dyes with two different types of base colours. Next to impossible. For most people. Thankfully, I had a secret weapon on my side. Her name.....is Harriet. She has been the studio head of the Surface Design department for many years and this woman knows colour. As in KNOWS COLOUR. She was in one day before Christmas and I begged he for a moment of her time. I think she was ironing some burnout velvet at the time and so had a moment to spare.
The conversation went something like this.
Me: Hi Harriet, can I use your brain for a moment?
Harriet: Sure.
Me: I need to match this colour (points to one colour in the multi coloured skein) It was dyed with acid dyes, but the skein that I have to dye has bamboo in it so needs to be dyed with FR dyes.
Harriet:Hmmm. Try 70% Navy, 20% Teal, and 10% Black.
Me: Thank you thank you thank you (accompanied with much bowing and scraping)
And here are the results. Top skein is the silk dyed with acid dyes and the colour that I was trying to match is blue in the center. Bottom skein is the silk bamboo skein that I dyed and rinsed until the cows came home.
I know that monitors present colours differently and all, but I am pretty impressed with Harriet's assessment of the colour and her knowledge of the fibre reactive dyes that we use at the school. I hope that one day, I will have half as much knowledge of colour and how to reproduce it.
When I found out that my co-organizer (coincidentally also named Sarah) would not be able to be there, I called in.....my other friend Sarah. Why do I feel like I'm in the remake of the Bob Newhart show?
In any case, Sarah was more than happy to keep me company, and refill the cookies and keep an eye on the mulled cider and do a thousand other things that needed doing while I was in at the sale and trying to flog my wares.
As payment I offered Sarah anything she wanted, such was my gratitude. Money, fast cars, drugs (well. Maybe Tylenol and Sucrets would be as far as that offer would go)
In any case, she just asked that I dye a skein of yarn to match a skein of silk that she bought off of me last year. No worries! I said....until I realized that the skein that I had dyed before was silk and was dyed with acid dyes and the skein that she wanted dyed to match was a silk bamboo blend and needed to be dyed with fibre reactive dyes because acid dyes will not dye bamboo.
Lesson time.... in my world, there are two basic types of dye. Acid dyes dye protein fiber, which is basically anything that comes off of an animal. Or out of in the case of silk.
Fiber reactive dyes are dyes that will work on cellulose fibers or anything that is plant based. Or, again, silk.
SO my task was to match a colour created with acid dyes with fiber reactive dyes. This is like comparing apples to oranges. There are two different types of dyes with two different types of base colours. Next to impossible. For most people. Thankfully, I had a secret weapon on my side. Her name.....is Harriet. She has been the studio head of the Surface Design department for many years and this woman knows colour. As in KNOWS COLOUR. She was in one day before Christmas and I begged he for a moment of her time. I think she was ironing some burnout velvet at the time and so had a moment to spare.
The conversation went something like this.
Me: Hi Harriet, can I use your brain for a moment?
Harriet: Sure.
Me: I need to match this colour (points to one colour in the multi coloured skein) It was dyed with acid dyes, but the skein that I have to dye has bamboo in it so needs to be dyed with FR dyes.
Harriet:Hmmm. Try 70% Navy, 20% Teal, and 10% Black.
Me: Thank you thank you thank you (accompanied with much bowing and scraping)
And here are the results. Top skein is the silk dyed with acid dyes and the colour that I was trying to match is blue in the center. Bottom skein is the silk bamboo skein that I dyed and rinsed until the cows came home.
I know that monitors present colours differently and all, but I am pretty impressed with Harriet's assessment of the colour and her knowledge of the fibre reactive dyes that we use at the school. I hope that one day, I will have half as much knowledge of colour and how to reproduce it.
Tuesday, July 21, 2009
One fish two fish....
One, two, three, four, five,
Once I caught a fish alive;
Six, seven, eight, nine, ten,
Then I let him go again.
Why did yo let him go?
Because he bit my finger so!
Which finger did he bite?
This little finger on the right!

The fish are finally wired and hung! The are swimming on the way into the bathroom. One of the few previously empty wall spaces in the house.
Once I caught a fish alive;
Six, seven, eight, nine, ten,
Then I let him go again.
Why did yo let him go?
Because he bit my finger so!
Which finger did he bite?
This little finger on the right!

The fish are finally wired and hung! The are swimming on the way into the bathroom. One of the few previously empty wall spaces in the house.
Saturday, July 11, 2009
Raku Pots
When I was a full time student, I took first year clay. After I graduated from the textiles program, I went back and took second year clay. I could have gone back for third year but the student loans were adding up and I figured that it was probably time to find a job. Sigh.
I spent the first day that we were making pots focused on throwing. It was not quite like riding a bike. The first pot that I threw was beautiful. The second was alright. And the third ended up in the muck pile. Peter gave a throwing demonstration and along with the explanations I started to remember a bit of what I had learned about 17 years ago.
I managed to get some measure of control over the forms that I was throwing but by no means was I in complete control.
I had taken a night class in 2000 so I had thrown since my student days. It was good to get back to it. I just counted and I threw 17 bowls! Oh my!
One of the other things that I really enjoy doing is building boxes. I hand built some during my 2000 night class and was planning to make some more this time around. Peter showed us a couple of videos and one of them had a fellow that uses an extruder. After a quick look at the extruder forms that the school has, I decided to make some extruded boxes.
I made some little boxes and some bigger ones. There were also some end bits that I thought would make interesting as small vessels.
Here are two more boxes and a vessel of sorts.
Another box.
On Wednesday, our last day to build, Mira came by and made a cup. She came back on Friday to glaze it. Liam came with her and I gave him a bowl to glaze. They both turned out really well.
Yet another box.
This one is my favorite box.
One of the other things that I made years ago was a mold for fish. I built clay fish and a friend helped to make a plaster cast of them. I brought the mold in and after I had made some fish I offered the mold to anyone else that wanted to use it. By the end were were referring to the fish as "those damn fish". They were slightly awkward to place on the small bricks because the backs were slightly hollowed out but had a hanging flap of clay on the back that made them uneven.
More fish. I think that my two favorites are the two in the front.
There are a few more pots that are less successful that I didn't take pictures of. Now I have to find a place to put a bunch of these. And of course there are some of you that will be getting some when you visit.
I spent the first day that we were making pots focused on throwing. It was not quite like riding a bike. The first pot that I threw was beautiful. The second was alright. And the third ended up in the muck pile. Peter gave a throwing demonstration and along with the explanations I started to remember a bit of what I had learned about 17 years ago.
I managed to get some measure of control over the forms that I was throwing but by no means was I in complete control.I had taken a night class in 2000 so I had thrown since my student days. It was good to get back to it. I just counted and I threw 17 bowls! Oh my!
One of the other things that I really enjoy doing is building boxes. I hand built some during my 2000 night class and was planning to make some more this time around. Peter showed us a couple of videos and one of them had a fellow that uses an extruder. After a quick look at the extruder forms that the school has, I decided to make some extruded boxes.
I made some little boxes and some bigger ones. There were also some end bits that I thought would make interesting as small vessels.
Here are two more boxes and a vessel of sorts.
Another box.
On Wednesday, our last day to build, Mira came by and made a cup. She came back on Friday to glaze it. Liam came with her and I gave him a bowl to glaze. They both turned out really well.
Yet another box.
This one is my favorite box.
One of the other things that I made years ago was a mold for fish. I built clay fish and a friend helped to make a plaster cast of them. I brought the mold in and after I had made some fish I offered the mold to anyone else that wanted to use it. By the end were were referring to the fish as "those damn fish". They were slightly awkward to place on the small bricks because the backs were slightly hollowed out but had a hanging flap of clay on the back that made them uneven.
More fish. I think that my two favorites are the two in the front.
There are a few more pots that are less successful that I didn't take pictures of. Now I have to find a place to put a bunch of these. And of course there are some of you that will be getting some when you visit.
Raku
Yesterday was the last day of the class and as such, we had a lot of work to do. A lot of pots to glaze. A lot of pots to fire. A lot.
Here is the class photo. Peter, our teacher, is second from the left in the back. He is a great teacher. Very patient and willing to help. The students were Erica, Ken, Jose, Ralph, Sean, and myself.
Peter was also willing to pull out the big heavy pot that I wasn't wanting to risk dropping. By this time my arms were getting sore and a little shaky.
I used a different set of muscles from the ones that I normally do. Grabbing objects with long tongs and really really not wanting to drop them is more difficult that one would think.
You can see a bunch of pots sitting on the top of the kiln. This warms them up a bit so that there is less shock when they get put into the kiln.
And some times you have to bend and stoop. Keep in mind that yesterday was the hottest day of the summer so far and we had to put on protective clothing because the kiln is nearing 1000 degrees. It was really hot sweaty work.
We fired late into the night. Erica's husband came by with their two beautiful dogs.
When the sun goes down you can really see how hot the pots are when they come out of the kiln.
You can see the fire too as the paper that we put in the barrel ignites.
In this photo, you can also see Heather, who is a potter and LOVES to load and unload the kilns. I was more than willing to step aside and let her take a few turns.
And the smoke. I really smelt bad when I finally got home.
I was ready to fall down after the last firing and so I left at about 10. There was still some clean up to do and the last person left at about 11:30.
All in all it was an awesome week, but I have to admit that I am not all that keen to repeat the process. I loved building the pots and glazing them, and I really liked seeing what came out of the kiln, but the firing was a bit too physically demanding for my liking.
Next post...... the pots!
Here is the class photo. Peter, our teacher, is second from the left in the back. He is a great teacher. Very patient and willing to help. The students were Erica, Ken, Jose, Ralph, Sean, and myself.
Peter was also willing to pull out the big heavy pot that I wasn't wanting to risk dropping. By this time my arms were getting sore and a little shaky.
I used a different set of muscles from the ones that I normally do. Grabbing objects with long tongs and really really not wanting to drop them is more difficult that one would think.You can see a bunch of pots sitting on the top of the kiln. This warms them up a bit so that there is less shock when they get put into the kiln.
And some times you have to bend and stoop. Keep in mind that yesterday was the hottest day of the summer so far and we had to put on protective clothing because the kiln is nearing 1000 degrees. It was really hot sweaty work.
We fired late into the night. Erica's husband came by with their two beautiful dogs.
When the sun goes down you can really see how hot the pots are when they come out of the kiln.
You can see the fire too as the paper that we put in the barrel ignites.In this photo, you can also see Heather, who is a potter and LOVES to load and unload the kilns. I was more than willing to step aside and let her take a few turns.
And the smoke. I really smelt bad when I finally got home.
I was ready to fall down after the last firing and so I left at about 10. There was still some clean up to do and the last person left at about 11:30.All in all it was an awesome week, but I have to admit that I am not all that keen to repeat the process. I loved building the pots and glazing them, and I really liked seeing what came out of the kiln, but the firing was a bit too physically demanding for my liking.
Next post...... the pots!
Thursday, July 09, 2009
Dirty Potter
I guess that I have been absent for most of the week. Sorry about that , but I have been playing in the mud. I have, for the last few days, become a dirty potter.
I have been taking part in an EdVentures workshop. As some of you may have read earlier, I am teaching a workshop in Temari Balls this summer as part of a workshop series . And since Monday, I have been taking a Raku Pottery Workshop. Monday, Tuesday, and Wednesday were devoted to making things to fire. They were then bisqued so that we could glaze them and then glaze fire them in the raku kiln. Bisquing is basically cooking the pots so that some of the chemicals are driven off and the pot becomes hard enough to handle without fear of breaking.
So sorry for no photos of the actual making of the pots. I spent most of the time with my hands (and various other parts of me) covered in clay. Clay and camera don't mix, and ever time I thought of taking pictures, I would think "I'll take pictures as soon as I wash my hands". Unfortunately, washed hands were quickly followed by something else equally dirty. So, sorry. no pictures of any sort of production.
Here is the set up for out raku firing. Normally, pottery is fired to a bisque then glazed and fired to what ever temperature the clay body can stand before melting. This process takes a couple of days. In raku, the clay is bisqued, then glazed and fired quickly. In fact, it takes about 45 minutes from the time that the pots get put into the kiln until they are ready to be taken out. It is TOTALLY AWESOME!
Here is the set up that we have. We first put the kiln in place (which you can't see here) then put the metal garbage cans at the ready. The garbage cans have a layer of sawdust in the bottom to give a good surface for the pots to sit on once they come out of the kiln.
Here are the different glazes that we are using. There are 11 different ones. So many possibilities! Erica, one of my class mates, is contemplating the possibilities.
Here is the kiln. It is a gas fired kiln that, once warmed up, takes about 40 to 45 minutes to reach about 920 C. We gradually increase the temperature over the time by turning up the burner.
This is the first firing in the kiln. It is easy to load because the kiln is cold. After the initial firing, the kiln is hot (oh baby so HOT) and it is a little more challenging to load it.
Here you see me and Shaun getting ready to unload. We have in protective leather jackets and aprons. The heat is intense. By the end of the first unloading and reloading, my face was beet red and stayed that way for about 40 minutes. After that, I used a face shield. As I said to someone, I am NOT a "real man".
The caution tape is to keep the general public from wandering in and burning themselves or getting in the way.
The pots come out of the kiln and go into the sawdust bins. After a few pots get put in, some newspaper gets dropped in and because of the heat of the post starts to burn. This causes what is called reduction. The burning paper causes the oxygen in the garbage can to burn out and the oxygen molecules that are in the various glazes start to be leached out by the oxygen deprived environment and a shift in colour occurs.
The lids are put back on the bins after each pot is put in it to keep the oxygen low.
Here are a few of the test pieces that some of the students have done just after being put in the bin.

We had a lot of interesting observers. There were periods of waiting......and waiting.....and checking of the kiln......and then suddenly a flurry of activity.

After the kiln was unloaded, the small pieces of fire brick that each pot was sitting on had to be unloaded and then new fire brick put on the shelves and on each piece of brick, a new pot was placed. It was very challenging to load the kiln. it radiated heat and so each fire brick needs to be put in with the long tongs (relatively easy) and then a new pot needs to be gently placed on each piece of fire brick with the tongs (not so easy). The pots can not be too close to the edge, nor can they be touching and you really don't want the pots in any place that is in a "hot spot", which is where the flames lick along sides of the kiln and the pots and makes a localized area where the temperature is hotter. The problem with this is that the glazes have all been tweaked to melt at about the same temperature ( thank you Peter!) and hot spots will melt the glaze in that area sooner. Melted glaze is molten glass and molten glass runs. Which can create one hell of a mess.
After the pots have sat in the sawdust and newsprint bins for about 15 minutes, it is time to quench them. The tongs are again used to lift the pots from the bins and gently placed into vats of water.
After a few minutes the pots are then cool enough to handle and the black from the smoke is scrubbed off. And there you have it! Raku pots!

And by the end of the day, I was totally bagged. This was just about the first day that we have had all summer that actually felt like a summer day. The sun was shining and really really hot. When we weren't "on duty" ( we each took turns loading and unloading the kiln as well as being the one who watched the kiln to make sure that it didn't over fire and run glaze all over the place) we would duck back inside to glaze a few more pots or grab a drink of water.
After we fired the last kiln of the day, most of us went out for a beer. And I meant to take a picture but... I have to admit that once that tall frosty beer was set in front of me, thoughts of pictures flew away.
Tomorrow, Day two of firing and .... my pots.
But be warned, it will be late in the day or maybe not even until Saturday. Tomorrow, we will fire until we are done. No matter now late that may be.
Oh my.
I have been taking part in an EdVentures workshop. As some of you may have read earlier, I am teaching a workshop in Temari Balls this summer as part of a workshop series . And since Monday, I have been taking a Raku Pottery Workshop. Monday, Tuesday, and Wednesday were devoted to making things to fire. They were then bisqued so that we could glaze them and then glaze fire them in the raku kiln. Bisquing is basically cooking the pots so that some of the chemicals are driven off and the pot becomes hard enough to handle without fear of breaking.
So sorry for no photos of the actual making of the pots. I spent most of the time with my hands (and various other parts of me) covered in clay. Clay and camera don't mix, and ever time I thought of taking pictures, I would think "I'll take pictures as soon as I wash my hands". Unfortunately, washed hands were quickly followed by something else equally dirty. So, sorry. no pictures of any sort of production.
Here is the set up for out raku firing. Normally, pottery is fired to a bisque then glazed and fired to what ever temperature the clay body can stand before melting. This process takes a couple of days. In raku, the clay is bisqued, then glazed and fired quickly. In fact, it takes about 45 minutes from the time that the pots get put into the kiln until they are ready to be taken out. It is TOTALLY AWESOME!
Here is the set up that we have. We first put the kiln in place (which you can't see here) then put the metal garbage cans at the ready. The garbage cans have a layer of sawdust in the bottom to give a good surface for the pots to sit on once they come out of the kiln.
Here are the different glazes that we are using. There are 11 different ones. So many possibilities! Erica, one of my class mates, is contemplating the possibilities.
Here is the kiln. It is a gas fired kiln that, once warmed up, takes about 40 to 45 minutes to reach about 920 C. We gradually increase the temperature over the time by turning up the burner.This is the first firing in the kiln. It is easy to load because the kiln is cold. After the initial firing, the kiln is hot (oh baby so HOT) and it is a little more challenging to load it.
Here you see me and Shaun getting ready to unload. We have in protective leather jackets and aprons. The heat is intense. By the end of the first unloading and reloading, my face was beet red and stayed that way for about 40 minutes. After that, I used a face shield. As I said to someone, I am NOT a "real man".The caution tape is to keep the general public from wandering in and burning themselves or getting in the way.
The pots come out of the kiln and go into the sawdust bins. After a few pots get put in, some newspaper gets dropped in and because of the heat of the post starts to burn. This causes what is called reduction. The burning paper causes the oxygen in the garbage can to burn out and the oxygen molecules that are in the various glazes start to be leached out by the oxygen deprived environment and a shift in colour occurs.
The lids are put back on the bins after each pot is put in it to keep the oxygen low.
Here are a few of the test pieces that some of the students have done just after being put in the bin.
We had a lot of interesting observers. There were periods of waiting......and waiting.....and checking of the kiln......and then suddenly a flurry of activity.

After the kiln was unloaded, the small pieces of fire brick that each pot was sitting on had to be unloaded and then new fire brick put on the shelves and on each piece of brick, a new pot was placed. It was very challenging to load the kiln. it radiated heat and so each fire brick needs to be put in with the long tongs (relatively easy) and then a new pot needs to be gently placed on each piece of fire brick with the tongs (not so easy). The pots can not be too close to the edge, nor can they be touching and you really don't want the pots in any place that is in a "hot spot", which is where the flames lick along sides of the kiln and the pots and makes a localized area where the temperature is hotter. The problem with this is that the glazes have all been tweaked to melt at about the same temperature ( thank you Peter!) and hot spots will melt the glaze in that area sooner. Melted glaze is molten glass and molten glass runs. Which can create one hell of a mess.
After the pots have sat in the sawdust and newsprint bins for about 15 minutes, it is time to quench them. The tongs are again used to lift the pots from the bins and gently placed into vats of water.
After a few minutes the pots are then cool enough to handle and the black from the smoke is scrubbed off. And there you have it! Raku pots!
And by the end of the day, I was totally bagged. This was just about the first day that we have had all summer that actually felt like a summer day. The sun was shining and really really hot. When we weren't "on duty" ( we each took turns loading and unloading the kiln as well as being the one who watched the kiln to make sure that it didn't over fire and run glaze all over the place) we would duck back inside to glaze a few more pots or grab a drink of water.
After we fired the last kiln of the day, most of us went out for a beer. And I meant to take a picture but... I have to admit that once that tall frosty beer was set in front of me, thoughts of pictures flew away.
Tomorrow, Day two of firing and .... my pots.
But be warned, it will be late in the day or maybe not even until Saturday. Tomorrow, we will fire until we are done. No matter now late that may be.
Oh my.
Saturday, June 06, 2009
Oh My!
Today is my birthday and what better way to celebrate than to talk about making cards.
OK. Supper is on the way and the Conde de Valedmar is already gone ( a little something that I picked up when I left behind the "mommy's night out", so maybe this is the second best way to celebrate a birthday. Or maybe not. I'll leave you to decide.
Let's talk about origami. Origami cards to be specific.
I start out with some funky paper. I recently discovered that there were some really wonderful scrap booking papers on the market. Some are two sided which makes for a really interesting card.
They are first cut to size. Then they are folded with the first few folds.
Because they are done en-mass here is a view of the first set of folds.
I then make the second set of folds and match the front's to the back's.
Then comes the gluing the fronts to the backs and the final pressing stage.
And of course, I just realized that the final product are down at the new shop that just opened for the summer, and I didn't take a picture.
I guess that you will just have to come back later.....
In the mean time, here is a little something that I found on my bedside table.

Isn't life interesting sometimes?
OK. Supper is on the way and the Conde de Valedmar is already gone ( a little something that I picked up when I left behind the "mommy's night out", so maybe this is the second best way to celebrate a birthday. Or maybe not. I'll leave you to decide.
Let's talk about origami. Origami cards to be specific.
I start out with some funky paper. I recently discovered that there were some really wonderful scrap booking papers on the market. Some are two sided which makes for a really interesting card.
They are first cut to size. Then they are folded with the first few folds.
Because they are done en-mass here is a view of the first set of folds.
I then make the second set of folds and match the front's to the back's.
Then comes the gluing the fronts to the backs and the final pressing stage.
And of course, I just realized that the final product are down at the new shop that just opened for the summer, and I didn't take a picture.I guess that you will just have to come back later.....
In the mean time, here is a little something that I found on my bedside table.

Isn't life interesting sometimes?
Subscribe to:
Posts (Atom)